About ClickMeeting
How is ClickMeeting different from competitive products?
Unlike any other platform, ClickMeeting software does not require installation. The organizer, presenters, and attendees need only the latest version of a web browser and Internet access to start using the platform.
ClickMeeting offers a 30-day free trial account that enables you to explore the possibilities of live, automated, and on-demand webinars with up to 25 attendees and live meeting with 5 attendees. Please note that you do not need to include any billing details to test out the platform.
It can serve as a general solution for videoconferencing, product demos, online courses, training sessions, online business meetings, collaboration, and huge events for even up to 1,000 attendees.
ClickMeeting is a browser-based platform that works on all the latest versions of browsers, operating systems, and devices, including iPad, iPhone, and Android devices. No IT skills nor setup are necessary to start using the software. Webinars are simple to organize, run, and join, and our features help you before, during, and after the webinar or the meeting.
The platform can be fully customized and connected to your CRM or CMS application throughout our advanced API. You can adjust and customize the events to meet all your needs. Upload your presentation files, prepare the agenda, and customize your brand colors or logo.
Learn more about the available features on our pricing page. We offer real-time support, and our team consists of friendly and professional customer advisors speaking several languages, including English, Polish, Russian, German, and Spanish. Click here to learn more about our availability.
Does the ClickMeeting platform require any installation to join the event?
Presenters and attendees do not need to create a ClickMeeting account to join a webinar or a meeting. They can be sent an email invitation, where they can click on the link redirecting to the webinar room. They also can copy the room ID, which consists of 9 digits, and paste it on this page.
Please remember that when logging in to the event room, you will be asked to provide your name (which does not have to be real) and your email address. We strongly suggest providing an existing email address, in order to receive any materials from the event you take part in (if the organizer decides to share any).
Attendees can also join a webinar from their iPad/iPhone/Android device using the ClickMeeting mobile app or a mobile browser (Google Chrome or Safari). This does not require any installation of software as it is based on the RWD technology. You can read more about it here.
By using a QR code, event participants can seamlessly switch from a laptop/desktop to a mobile device without having to re-enter login details.
Users can also dial into the webinar room or use toll-free numbers if the organizer decides to enable such a way of joining the event.
What technology does ClickMeeting use?
The audio-video technology that ClickMeeting uses is HTML5 technology and WebRTC. It is the highest standard that connects the browser with ClickMeeting in real-time. This technology not only makes your work with the application smooth and much more comfortable but, above all, delivers your webinar audience razor-sharp audio-video quality.
At the moment, you can use the WebRTC technology with the latest versions of web browsers like Google Chrome, Opera, Safari, Mozilla Firefox, Yandex, or Edge (Chromium). These browsers entirely support the new audio-video technology.
However, we strongly recommend choosing Google Chrome as this browser is the most advanced in terms of integrating with WebRTC technology.
What is the RWD room?
RWD stands for Responsive Web Design. In terms of the webinar room, it means that your attendees can join your event on their mobile devices with their browser. They will not have to download the application to enter the webinar room.
So far, the RWD room version is available for webinar attendees only. It means that, as a webinar host or as a presenter, you need to use the ClickMeeting mobile app to join and run the event on your mobile device. Moreover, an attendee who joins the webinar on the RWD room version cannot be enabled to be a presenter.
The RWD room version works only on Safari and Google Chrome. To join a webinar in the RWD room, attendees need to have the latest version of one of these browsers on their mobile devices.
The RWD room version is available for webinars only. If you host an online meeting and want to collaborate on mobile devices, you and your attendees will have to use the mobile application.
Please note that embedded event rooms are not supported by the RWD version.
How much bandwidth do I need for ClickMeeting?
The free trial account allows you to host events with one additional presenter. This means that there are two camera feeds (as well as two seats) available for the organizer of the event and the presenter.
Paid accounts allow you to have up to 8 video camera feeds during a webinar and 40 video camera feeds during a meeting.
ClickMeeting works with all laptop built-in cameras and most of the webcams. A more advanced or professional camera may need installing additional software or hardware and must be consulted with our Sales Team. To test the camera compatibility, we recommend creating a free trial account.
You can purchase up to 14 presenter seats; however, only up to 8 presenters will be able to turn on their microphones and cameras during a webinar. Please note that additional presenter seats are available only during webinars, not meetings. To ensure the optimum stream quality, we recommend that each event participant use a separate network.
ClickMeeting technical specification:
Call type | Attendee (download | Presenter (upload |
Audio | 512 kbps | 512 kbps |
Audio + video SD | 512 kbps + 1 Mbps | 512 kbps + 1 Mbps |
Audio + video HD | 512 kbps + 2 Mbps | 512 kbps + 2 Mbps |
Screen sharing (Lite Mode) | 2 Mbps | 2 Mbps |
Screen sharing (HQ Mode) | 2 – 5 Mbps | 2 – 5 Mbps |
Screen sharing (Browser-based) | 1 – 4 Mbps | 1 – 4 Mbps |
To achieve the best possible video quality, each event participant should make sure they have a strong and stable Internet connection. It is best to use a private WIFI or an Ethernet Cable and keep unnecessary apps from running in the background while hosting an event. Same goes for unnecessary browser tabs and windows.
Please postpone any updates and avoid uploading/downloading large files.
Feel free to test your microphone and camera by running an AV test in the account panel (for hosts) or in email invitations (for attendees).
What are the hardware and software requirements to host events on ClickMeeting?
Requirements that must be met:
- 2 GHz dual-core processor or better (4-core preferable);
- 2 GB of RAM (4 GB or more recommended);
- An operating system such as Windows 8 (Windows 11 recommended), Mac OS 10.13 (the newest version recommended), Linux, Chrome OS.
As ClickMeeting is a browser-based platform, it is required to use the latest official versions of the following browsers: Google Chrome, Mozilla Firefox, Safari, Edge (Chromium), Yandex, or Opera.
To be sure you can host your event flawlessly, you can check the requirements with our System configuration test. On the right-hand side of the test, you can listen to a sample piece of music to check if your speakers or plugged-in headphones are working properly. You can check the audio level by talking to the microphone and observing the moving bar level, as well as see the stream from your camera.
The left-hand side of the System configuration test allows you to check if your connection to our conference servers is all set, and if the operating system and web browser are up to date. Please remember that the ClickMeeting platform selects available audio, microphone, and camera output by default.
ClickMeeting works with all laptop built-in cameras and most of the webcams. A more advanced or professional camera may need installing additional software or hardware and must be consulted with our Sales Team. To test the camera compatibility, we recommend creating a free trial account.
In order to use the service (including participating in conferences) on certain mobile devices, it may be necessary to download a relevant app in the iTunes App Store or Google Play Store. To use the service in the full audio-video range during a conference, it is necessary to have a webcam, microphone, and headset or loudspeaker connected to and recognized by your device, and they should not be simultaneously used by any another application.
What recording quality does ClickMeeting offer?
You can record your event in full HD quality (1080p). Make sure you enable it in the Advanced Settings of your account panel before joining the event. These settings will only apply to future recordings. You can enable the HD recording quality individually for a specific event under Automation → Recording Quality. The recording will be saved in your account panel and will be available for download. When downloaded, HD files will take up more space on your device due to the higher quality.
How do I use the ClickMeeting mobile app?
Start by downloading the app to your mobile device (iOS or Android).
Scan this QR code with your phone to install the app.
iOS

Android

Then join an event using the mobile app. As a host, you would need to log in to your ClickMeeting account first. Launch the app and choose I’m a host, then enter your email/login and password.

Once you have logged in, you can join any of your previously scheduled events. Choose an event from the list and click the Join event button. If you are in a hurry, click the Meet now button to instantly join a new event room.
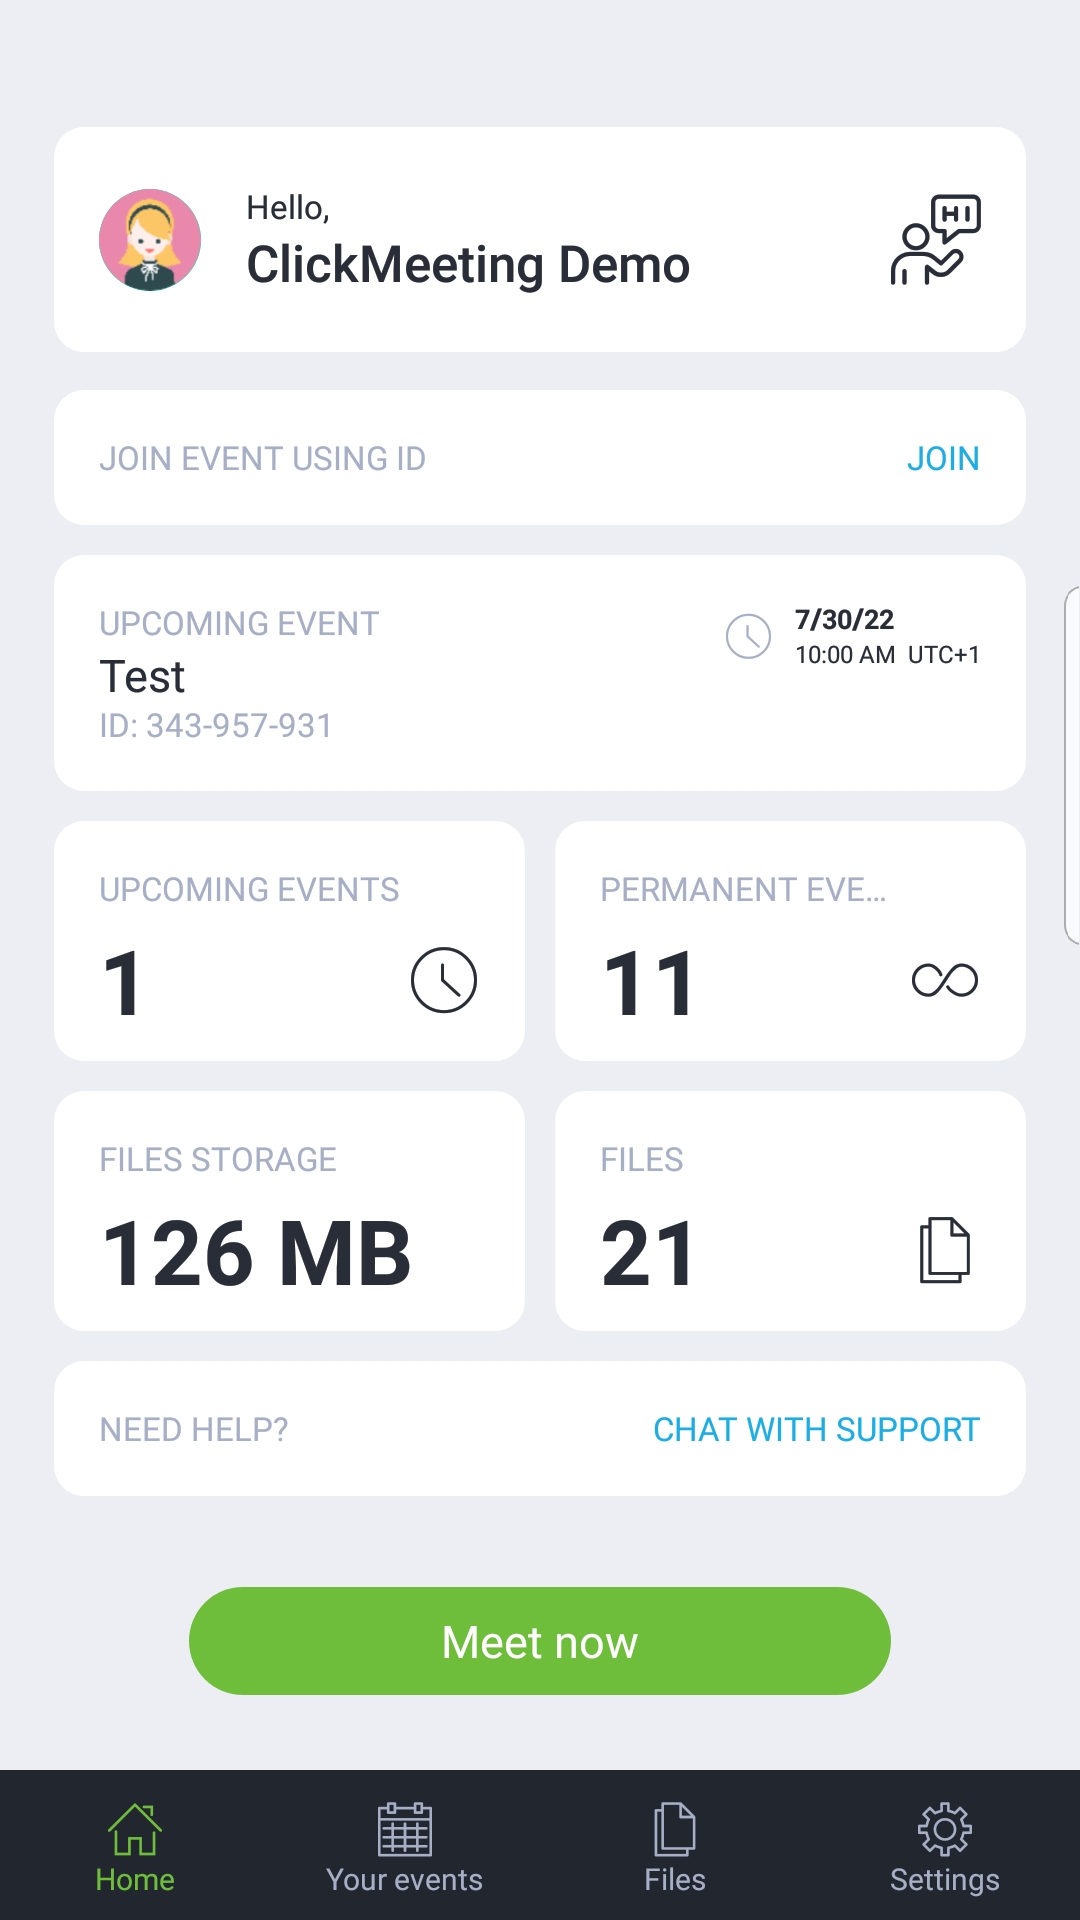
Along with accessing your ClickMeeting events, you can download/delete your files in the Files tab of your account panel.

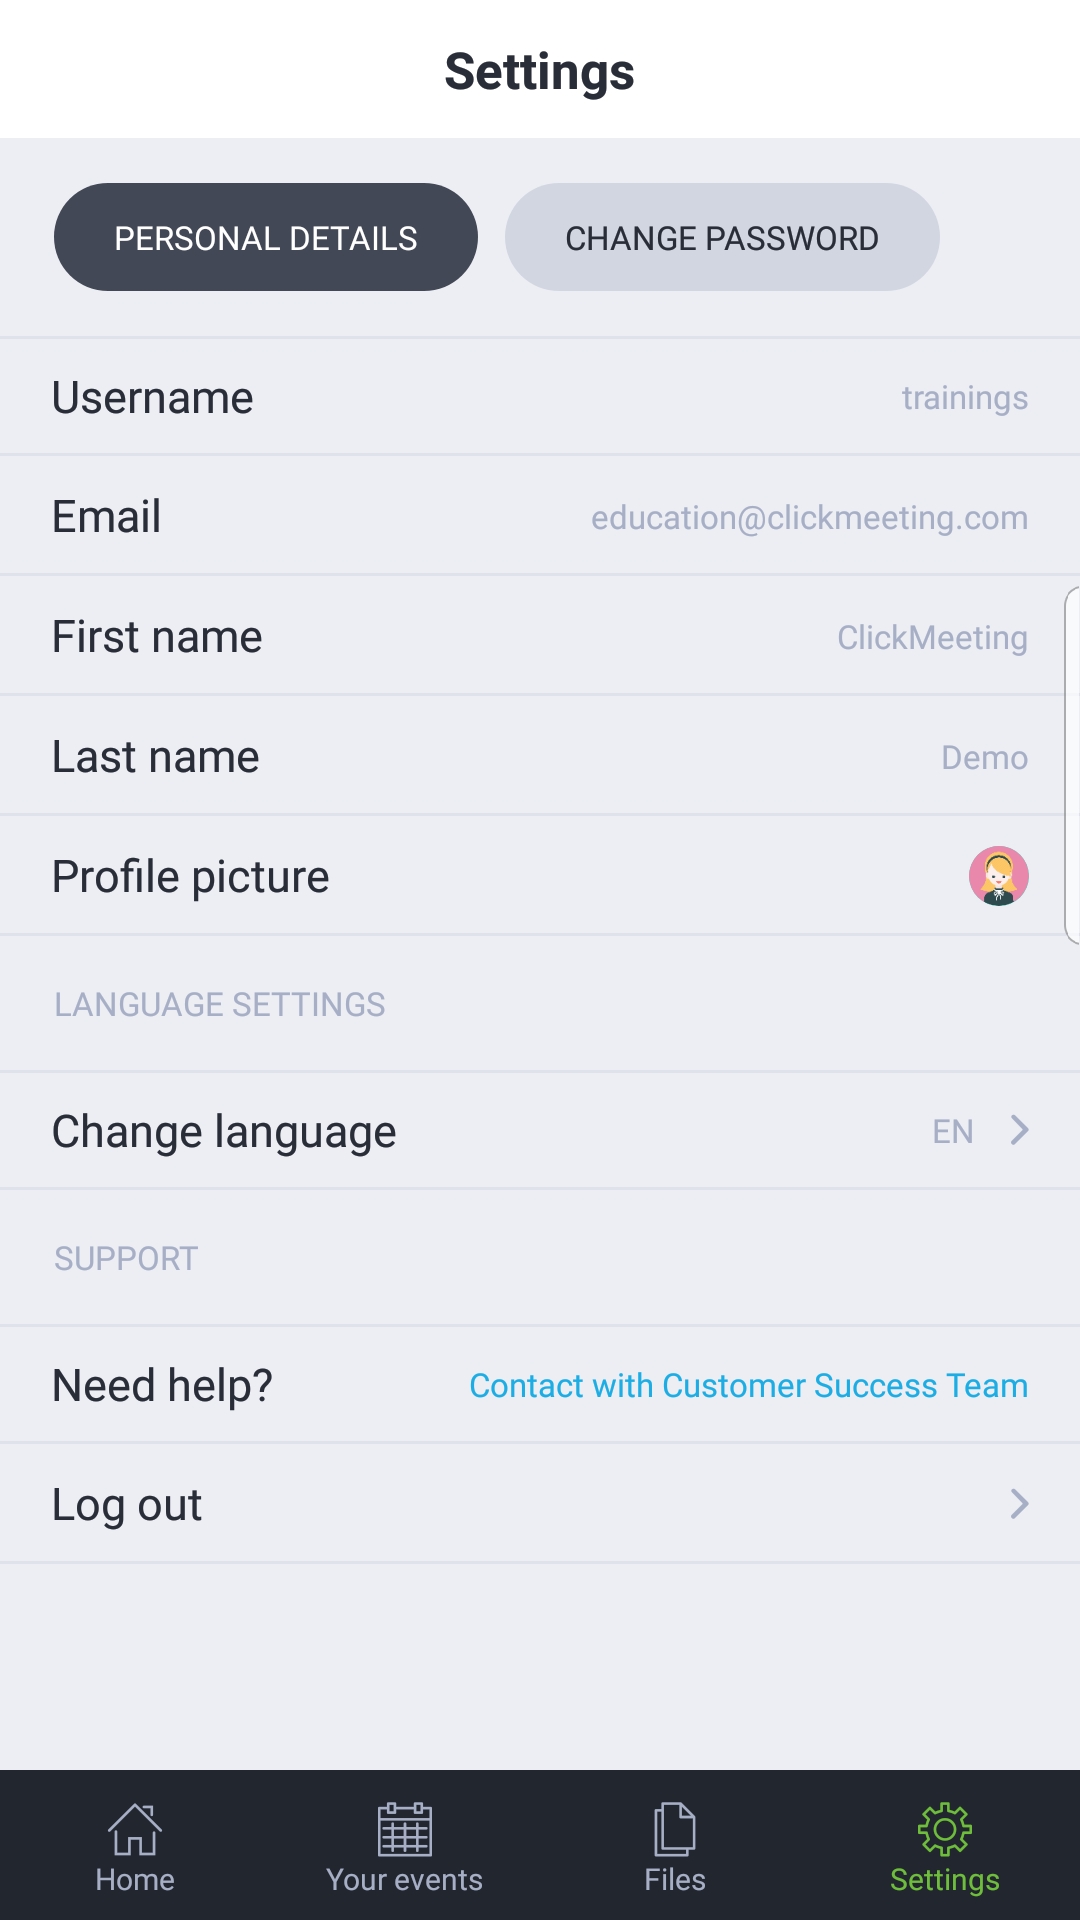
You can also view your account settings and contact our Customer Success Team, if necessary – to do so, please enter the Settings tab.
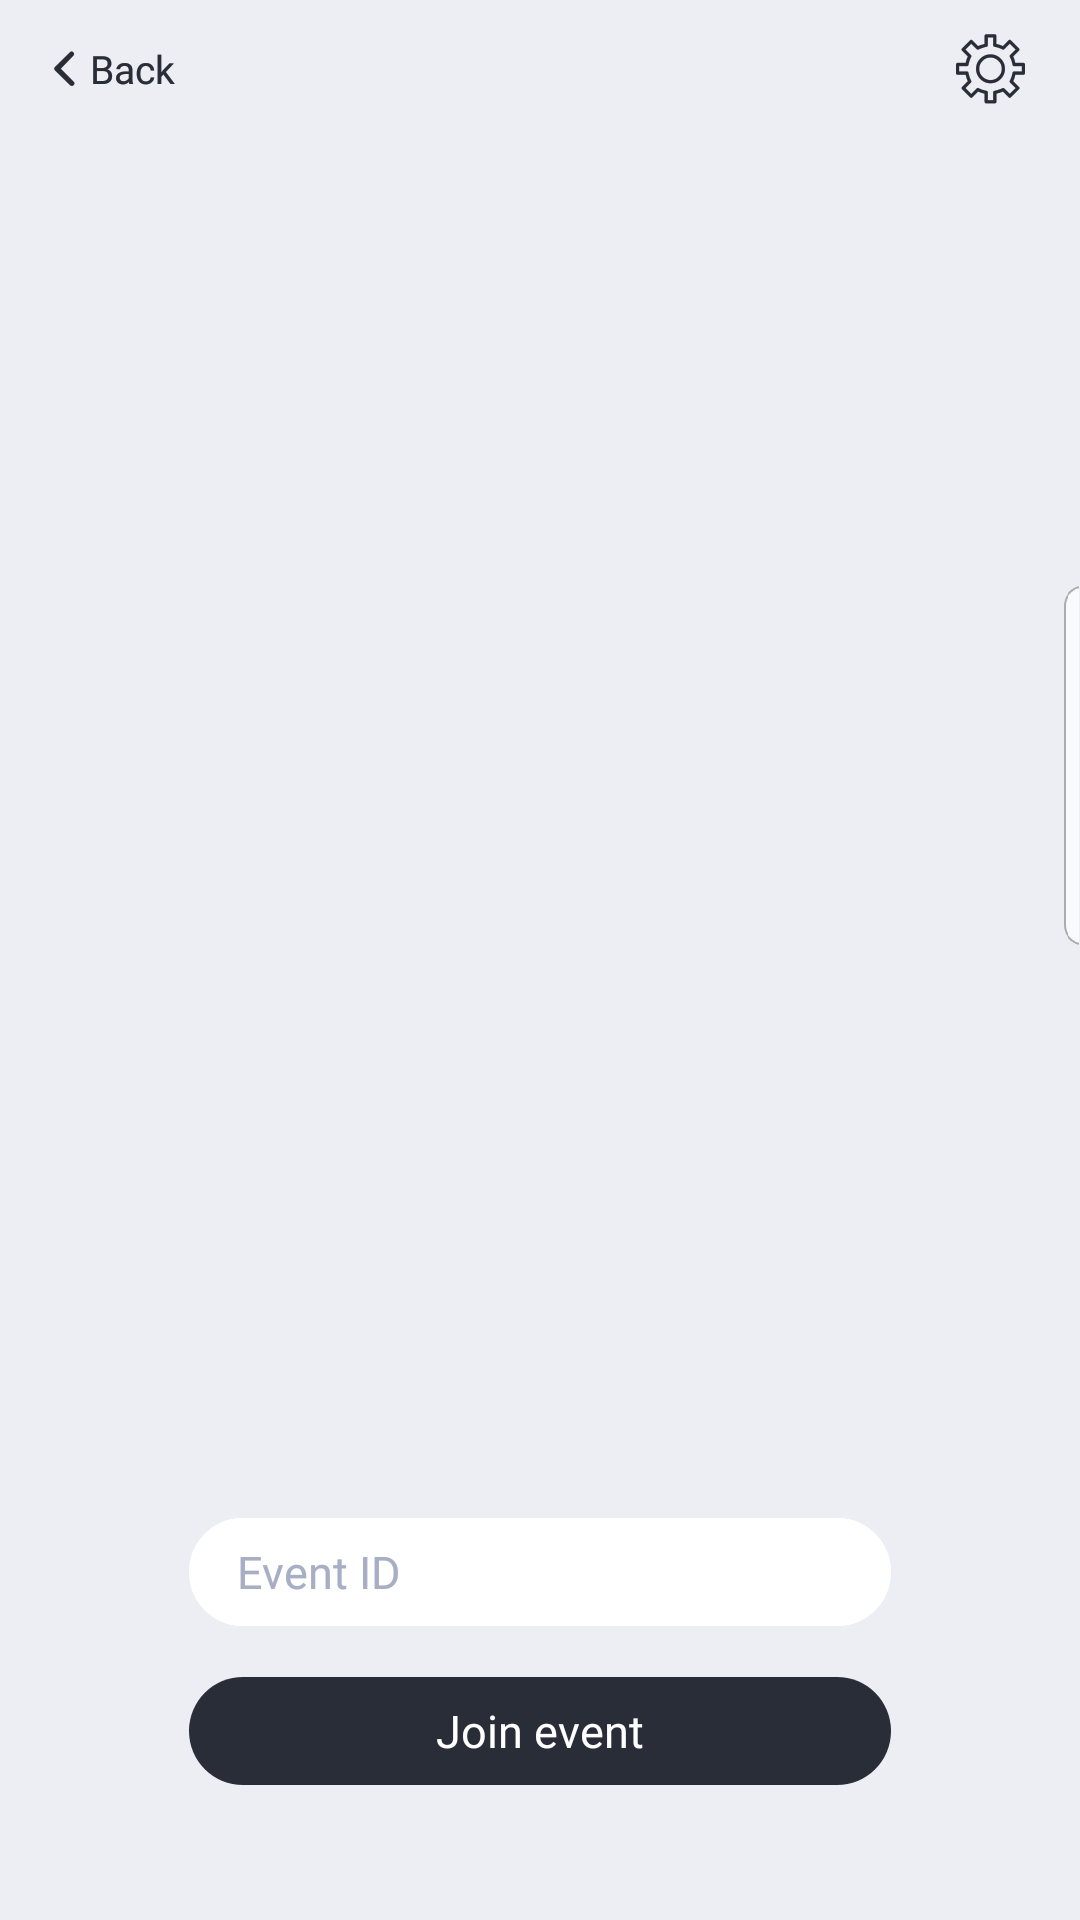
To join an event as an attendee, launch the mobile app, choose I’m an attendee and enter the event ID. The ID is included in a ClickMeeting email invitation.
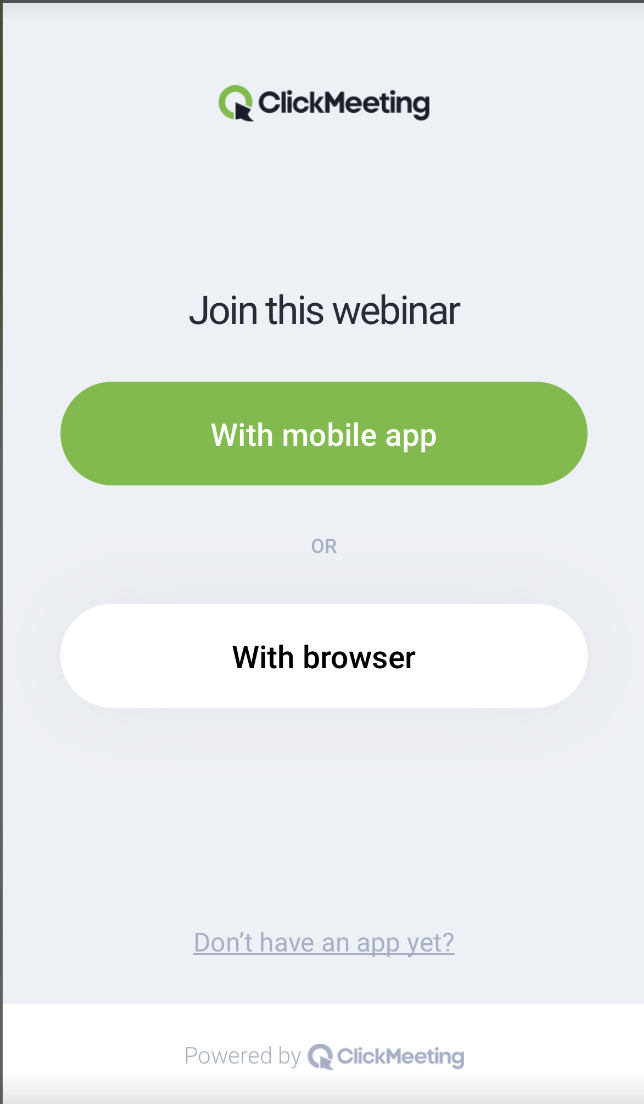
Alternatively, the host can share it through other channels (e.g. on social media/in a text message). If you have received an event URL, e.g. as part of a ClickMeeting email invitation, click the URL to join the event. You can choose if you would like to join it using the mobile app or from a mobile browser (Chrome/Safari).
To join the room as a presenter, click the link in your event invitation. You will be automatically redirected to the ClickMeeting mobile app.
As soon as you have joined the event as a host or presenter, you can access the following tabs at the bottom of the screen: Event along with the AV bar, Chat, Attendees, Settings, Info, Menu. The buttons at the top enable you to start the event, start recording, as well as leave the event room.
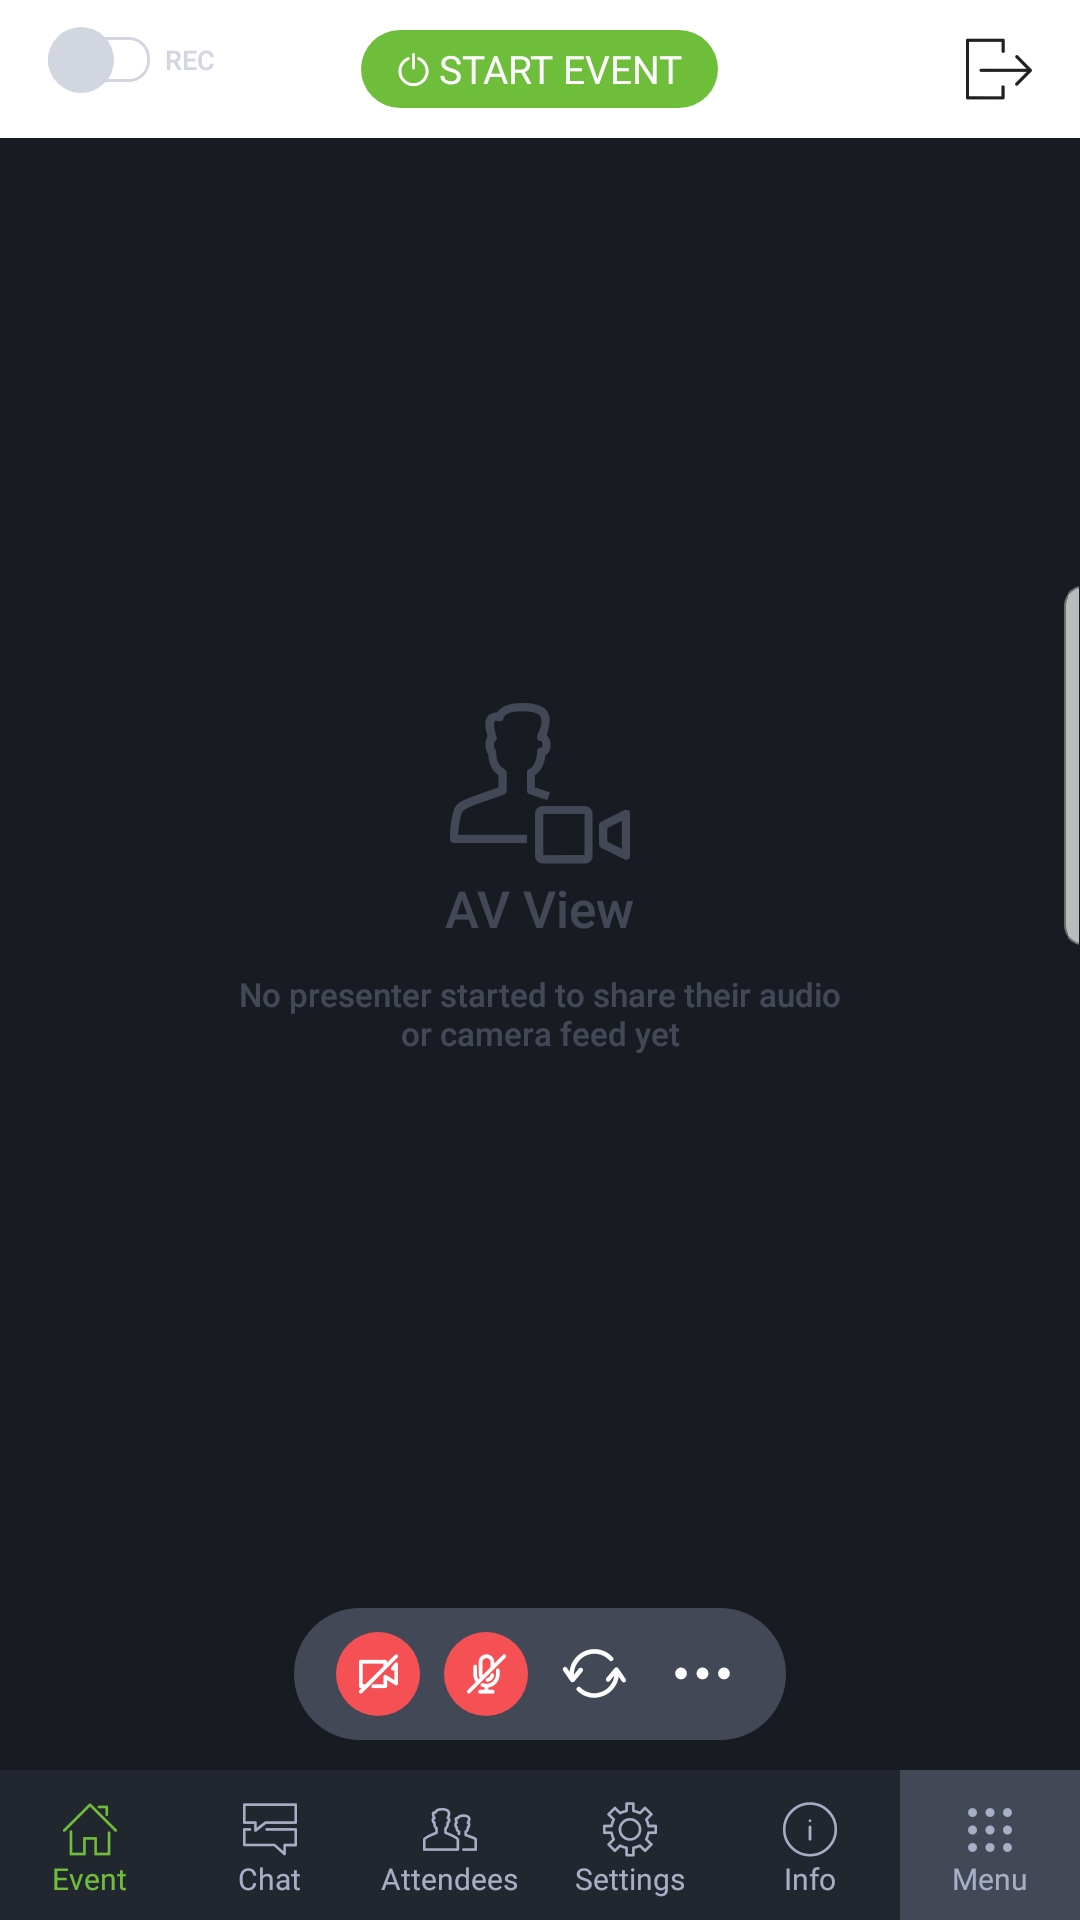
The buttons to enable/disable microphone and camera are located in the AV bar. Tab the three dots menu in the AV bar to access more features: Mute all, Camera mirror view, AV quality and AV layout selection. Tap the icon next to the mic icon to change from using the smartphone’s front camera to the rear one.
The Chat icon is visible to everyone in the event room. The host or presenter can disable the chat feature at any moment or enable chat moderation under Settings.
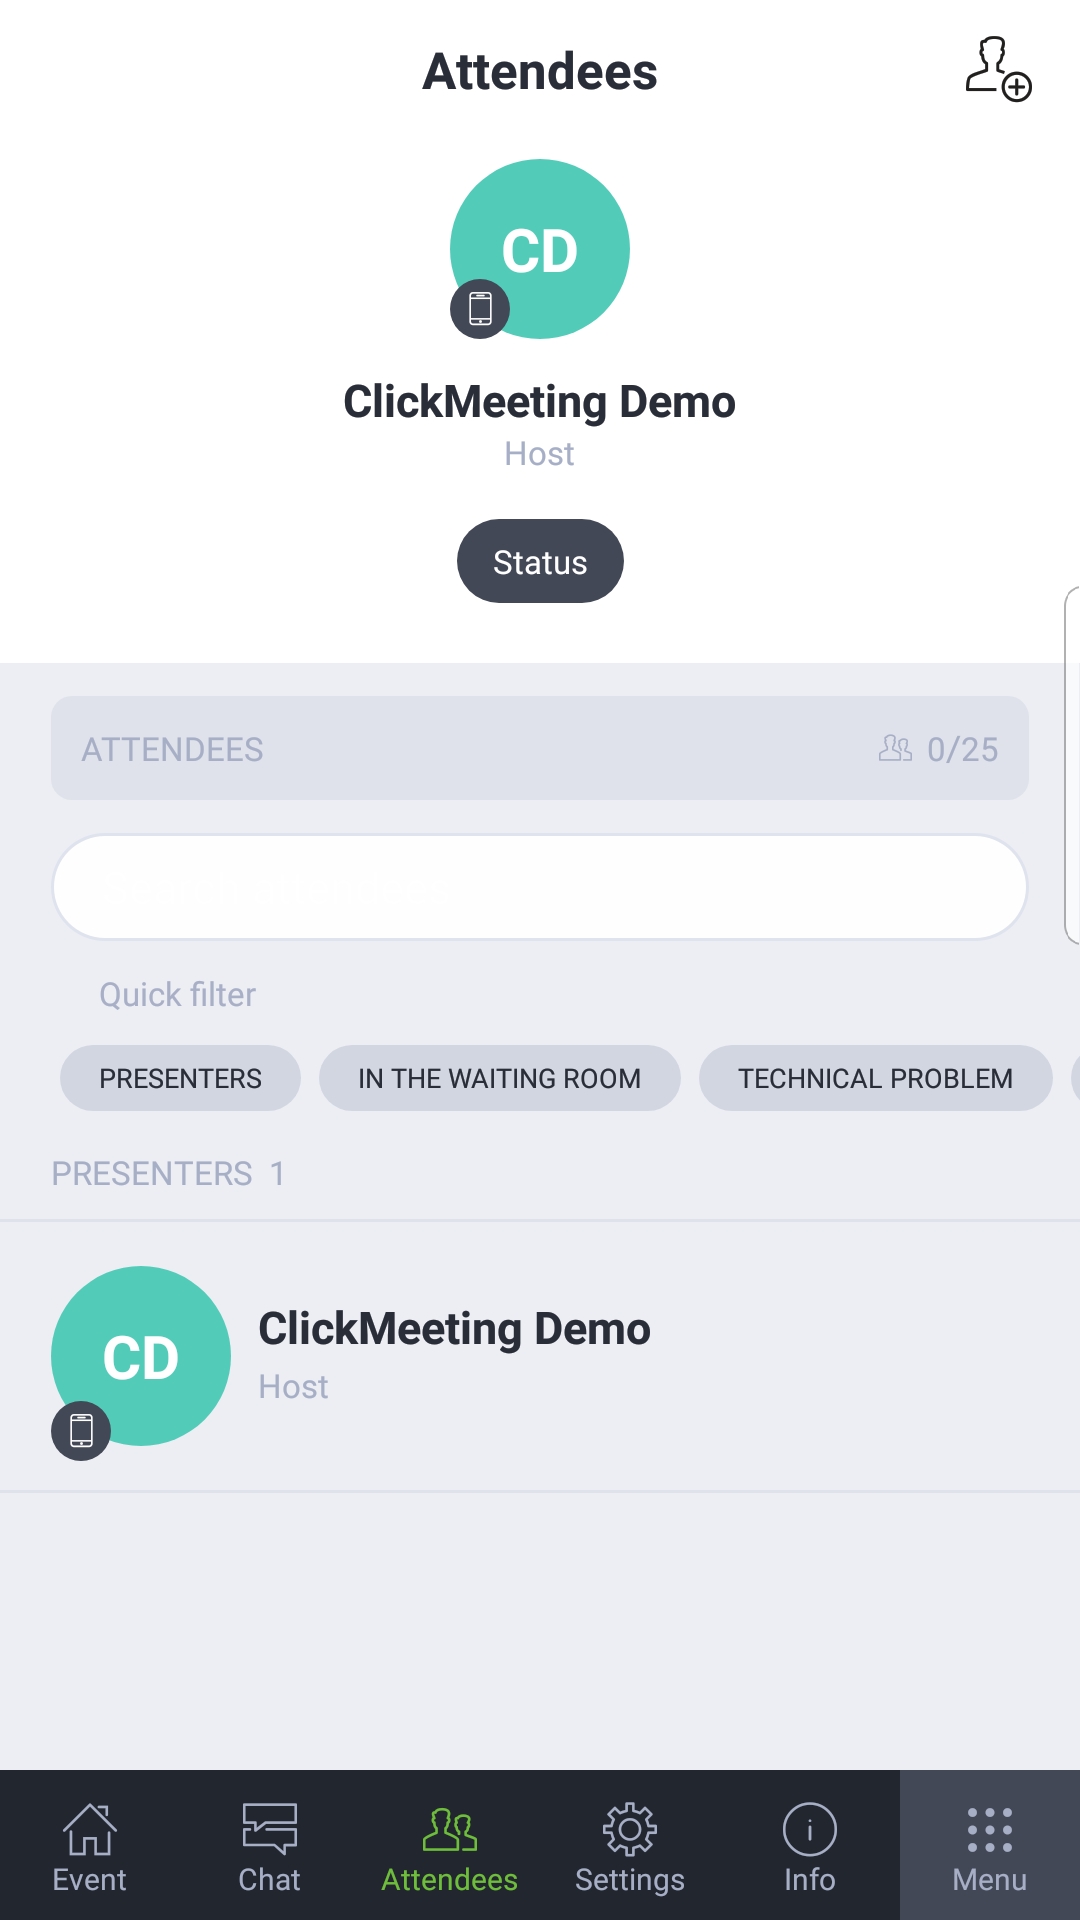
Enter the Attendees tab to view everyone who has joined the event. Use one of the 6 categories to easily search for/filter your participants: Presenters, In the waiting room, Technical problem, Raise hand, Web, Mobile. To quickly invite more attendees, tap the icon in the top right corner of the Attendees tab and share your event details on Instagram, Messenger, Facebook, Gmail, Whatsapp, through a text message, etc.
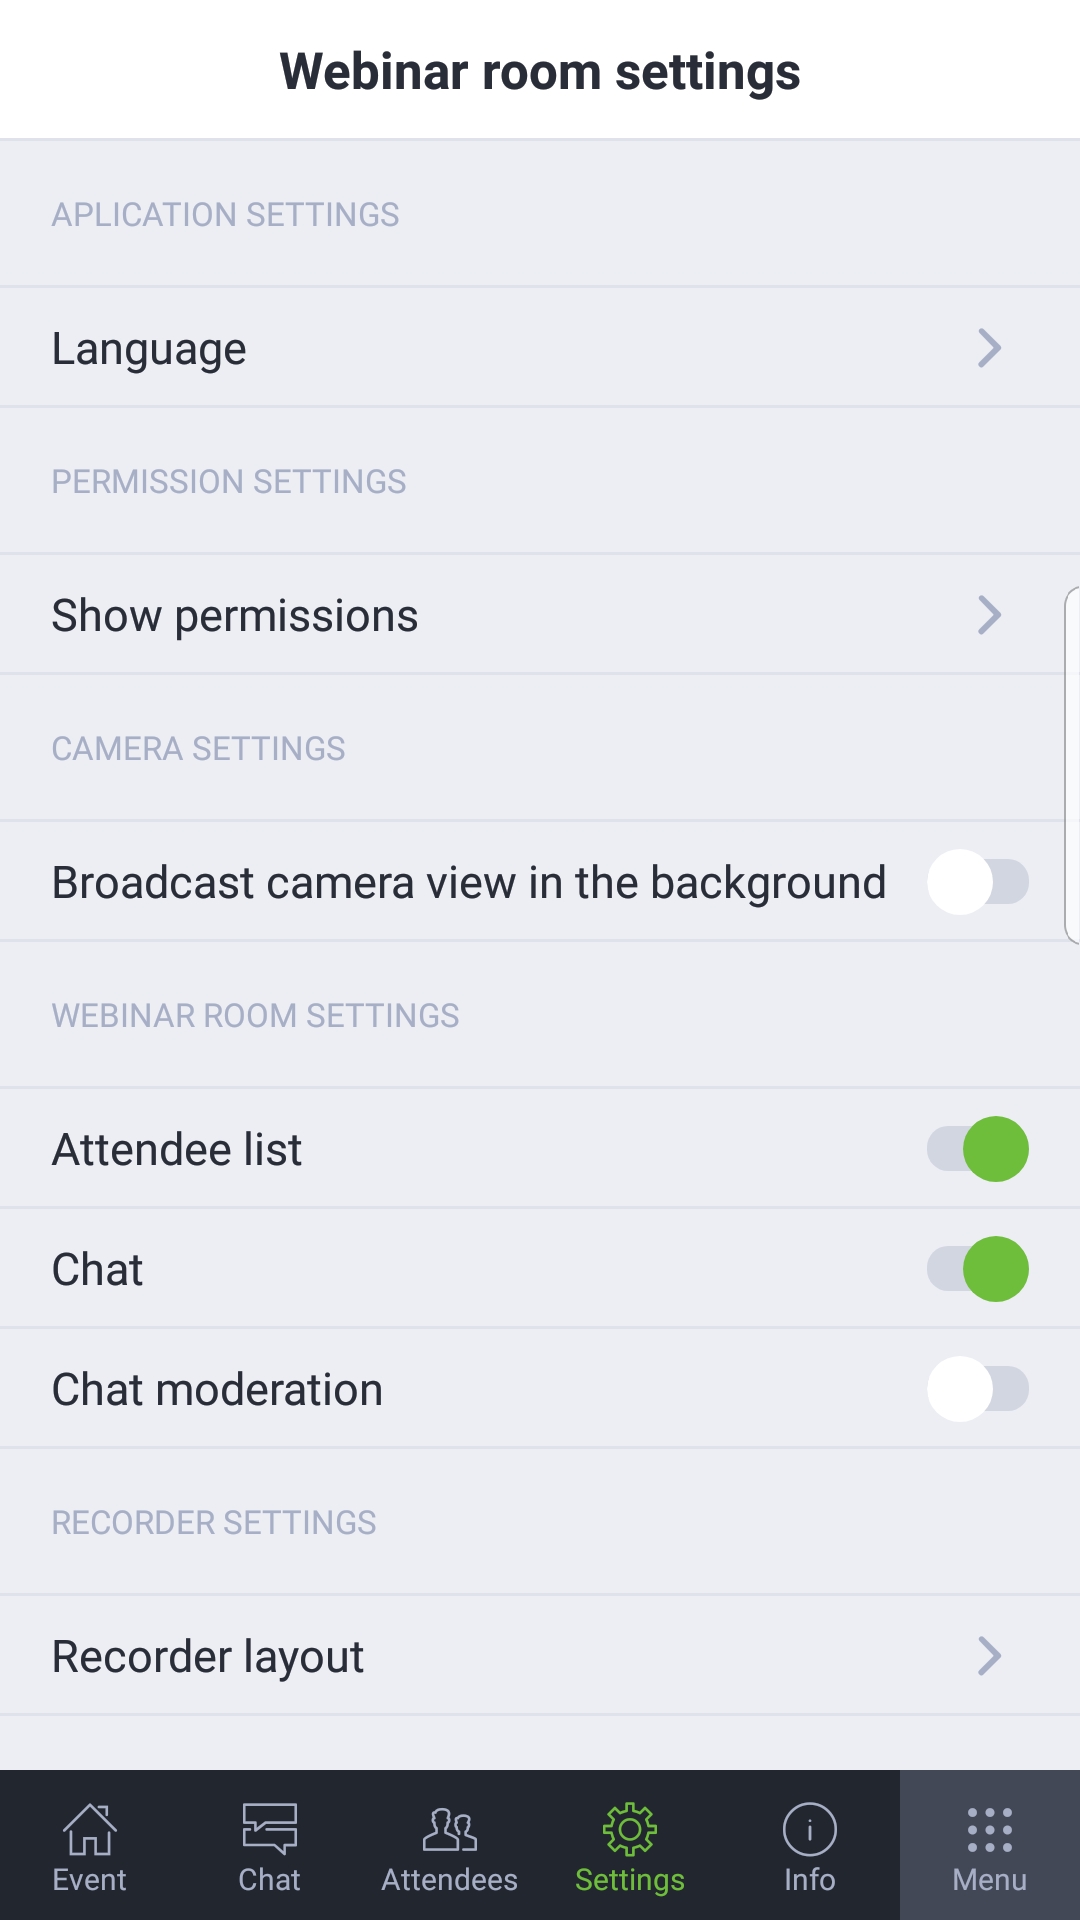
Go to Settings to change the app interface language and manage app permission settings. You can also enable/disable the attendee list there, manage chat settings (enable/disable the chat, enable/disable chat moderation) and select your preferred recording layout. If you are using our mobile app on an Android device, click Broadcast camera view in the background to keep streaming your camera video in the background while the app is minimized.
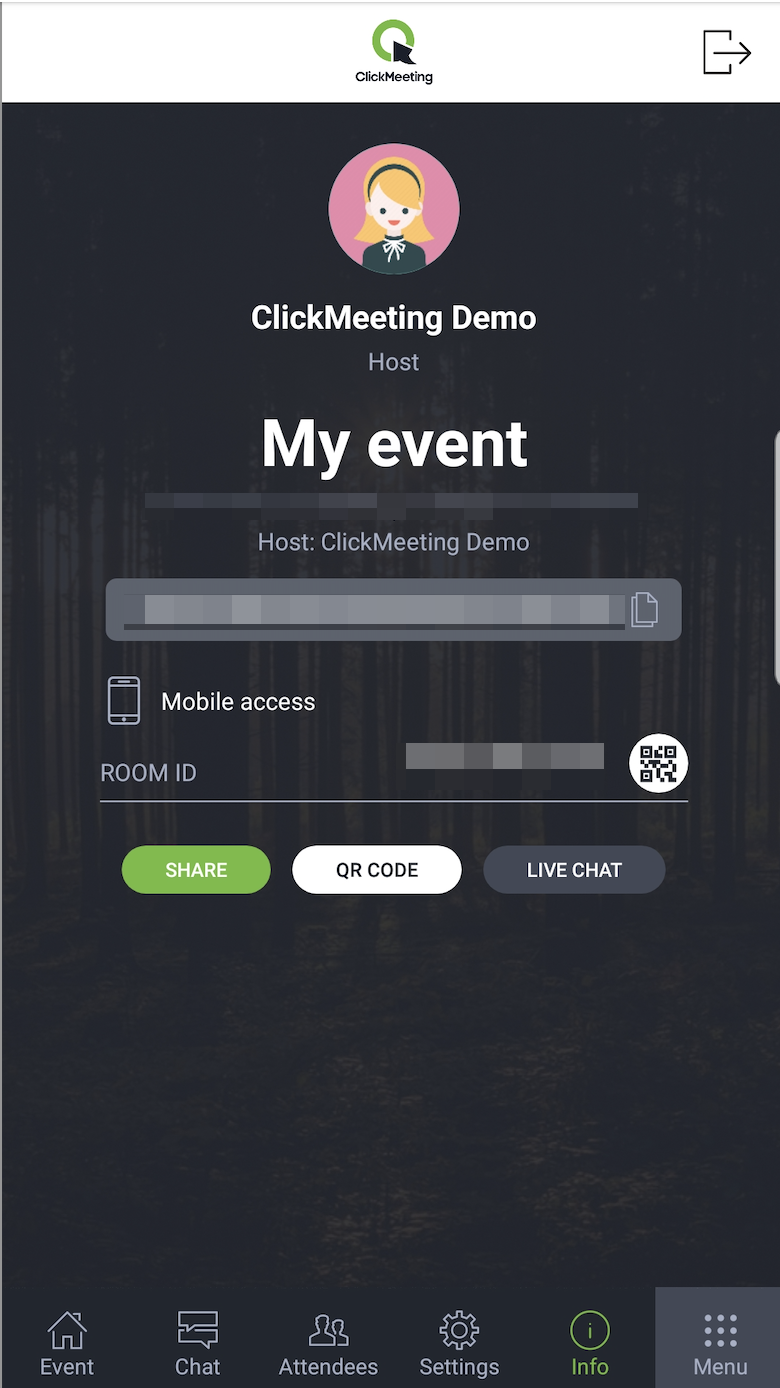
The Info tab contains information about the event host and the event itself. There you can also start a live chat with our Customer Success Team, if needed.
Finally, the Menu tab reflects the Menu in the desktop version. It has the same features except for the Live streaming services.
How do I join an event from an iPad, iPhone or Android device?
Launch your ClickMeeting mobile application.
If you are using a tablet, choose I’m a Participant or I’m a Host. Then enter Meeting ID, click Join, provide your name and email address, and again click Join.
If you are using a smartphone, the Participant tab is displayed by default. To change to Host, simply change the tab. Enter meeting ID, your name and email address, and click Join.

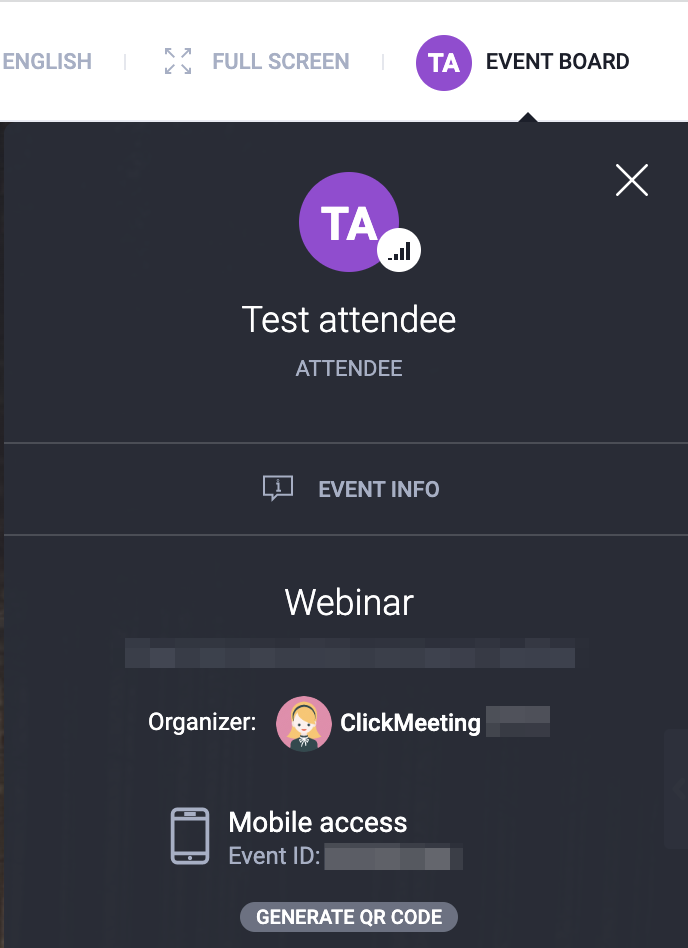
Use the QR code feature to seamlessly join an active event on your mobile device. Switch from a web browser to a mobile browser/ClickMeeting mobile app without having to re-enter your login details. Simply enter the Event board tab in the top right corner of the event room, click Generate QR and then scan the code with your mobile device. If you are joining the event as a presenter, please note that you need to have the ClickMeeting mobile app installed to use the QR code feature.
How to use the ClickMeeting desktop app?
Joining and managing events can be done in a few ways. You can either choose an updated browser and join your event from there. Alternatively, you can download the ClickMeeting mobile app, which is compatible with any smartphone, or you can use our desktop application which not only will allow you to join or manage your conferences but also change the virtual background in your camera stream.
Before proceeding to the meeting login page, your attendees get to choose if they wish to join it via ClickMeeting desktop app or from a web browser. Please note that this option is enabled by default. To disable it, log in to your account, go to Account settings → Advanced settings, then deselect Allow users to choose how to join the event and click Save.
To be able to join, manage, and host events with our ClickMeeting desktop app, you would need to download it first. Click here if your device has the Intel-based Mac OS system, here if your device has the Apple M1/M2-based system or here if you prefer to work with Windows. The download and installation process will take only a few moments.
After the installation is ready, open the application and wait for it to load. Install any updates if necessary. This will make your experience better and help you avoid unnecessary issues during your event. The update might take a while, so please do not close the popup window.
The next screen on the desktop application will prompt you to choose whether you would like to log in as a host or as an attendee. The host will be asked to provide their username or email address assigned to the account as well as the password. The attendee will need to provide the event ID or room URL to join the conference.

If you’re an attendee, you will be redirected straight to the event room or the waiting room. In the latter case, please wait for the host to start the event.
The organizer, however, sees a different layout of the application. Once the application loads, you will see four tabs containing the event you have already scheduled. You can check which of them are your upcoming, permanent, or favorite events. If you would like to create one, click the Create event button, and choose which type of event you would like to schedule. Please note that creating events within the desktop app is not possible and you will be redirected to your standard account panel to do this in a browser.
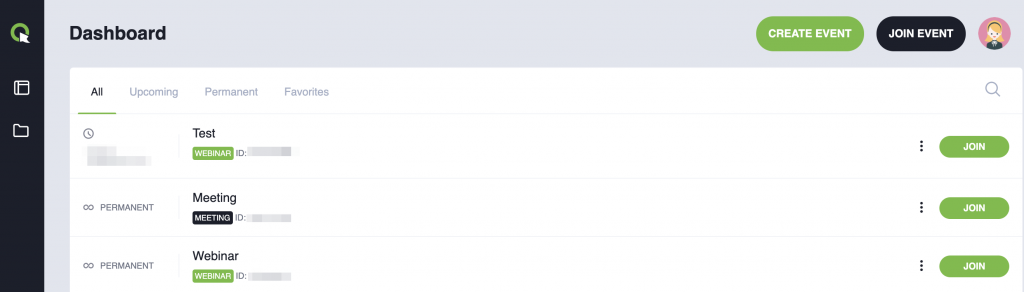
To join the event from the list, click the Join button next to it or click the Join event button in the upper-right corner of the desktop app. Provide the event ID or room URL and join the conference.
Please note that each event can be added to the Favorites section, and they will be listed in the Favorites tab. We recommend adding here your recurring daily, weekly, or monthly events. This will help you have them at your fingertips at all times.
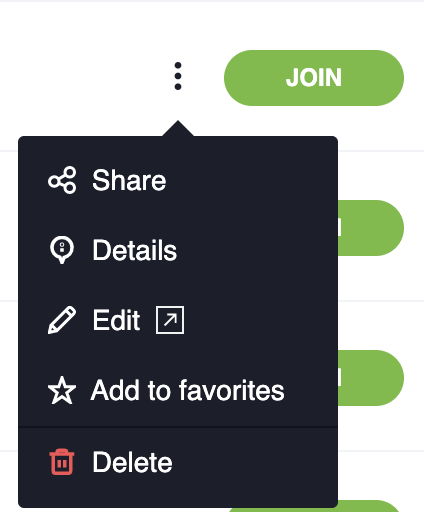
Each event on the list can be easily managed. Click three dots next to the event of your choice and decide if you would like to share it on your social media or via email message. You can check the details of each event in the Details tab and find the room URL, event ID, event type, and access type info there. You can also edit the event (this action will redirect you to your browser-based account panel) or delete it if you do not need it anymore.
All of the files that you would like to present during your event can also be managed from and added to the desktop application. Click on the folder icon on the left to display your presentation, image, video, audio, and other files. Preview, download, delete, and add files you need during your webinar or meeting. Remember that the file you upload cannot be bigger than 1 GB.
Click on your profile picture in the upper-right corner of the app to find out more details. In the first tab, Profile, you will find all details regarding your account and subscription plan. In the Settings tab, you can change the Appearance settings and choose the app mode (light or dark).

The Background section allows you to enable virtual background during your event. Choose one of the available background pictures, add your own picture, or simply blur the background. These settings can be easily adjusted by clicking the Adjust button. In the Language tab, you can choose the language you want to use for the app.

What security certifications does ClickMeeting have?
ClickMeeting holds a number of certificates which include an ISO/IEC 27701:2019 and GDPR compliance certificate related to ClickMeeting’s Management System in the context of the ClickMeeting Platform. The certificate was issued by Bureau Veritas Certification.

Related materials